Pages

Saturday, September 22, 2012

Scored Some Aunt Lydia's!!!

Laurie and I took a trip to Salvation Army today to see if we could find any good bargains. It's surprising some of the bargains you can find if you really look hard enough. I have picked up a few really nice cast iron pans among other things. Today I couldn't believe when I saw skein upon skein of Aunt Lydia's Rug Yarn. For those that don't know Aunt Lydia's Rug Yarn is what Gary LaFontaine used to tie his famous Emergent Sparkle Pupa and Deep Sparkle Pupa patterns. I now have more yarn than I know what to do with. I will probably put some up on eBay at a good price to share my good luck with my fellow fly tiers.  Here is a sample of what I picked up.


I guess I should put some of this yarn to use and tie up a few Emergent Sparkle Pupas.  Gary LaFontaine spent a few years in scuba gear observing trout and the insects they eat in their natural habitat. One of the observations he made was when the caddis flies were emerging they had a halo of air around their bodies as they were swimming to the surface. To mimic this halo of air Gary developed the emergent sparkle pupa. The antron fibers in Aunt Lydia's Rug Yarn trapped the air between the fibers producing the halo effect he was looking for. This fly has proven itself to be a trout magnet when the caddis are emerging. If you haven't tried them tie one on and give it a shot.

 
Emergent Sparkle Pupa Cream and Brown
(This pattern can be tied in different color combinations)


Emergent Sparkle Pupa Cream and Brown
 
Hook - Mustad 94840 #12-20
Shuck - Cream Antron Yarn from Over Body
Over Body - Cream Antron Yarn
Under Body - Brown Haretron Dubbing Touch Dubbed
Wing - Deer Hair
 
 
Step One
 
Start Thread
 
Step Two
 
Tie in Yarn on Top and Bottom of Hook
 
Step Three
 
Apply Wax to Thread and Touch Dub.
 
Step Four
 
 
Wrap Dubbing Forward. Body Should Be Very Sparse and Buggy
 
Step Five

 
Bring Bottom Portion of Over Body Forward Creating a Bubble and Tie Off
 
Step Six
 
Bring Top Portion of Over Body Forward Creating a Bubble and Tie off
 
Step Seven
 
Clip a Few Stands of Over Body and Pull Back Creating Shuck
 
Step Eight
 
Tie In Deer Hair Wing
 
Step Nine
 
Apply Dubbing and Create Head. Whip Finish


Friday, September 21, 2012

Go Suck an Egg... Well if You're a Leech

Is it just me or does the weather seem to change for the worse right after you get out of work? All day today was the perfect fall day. Temperatures were in the low 70s with bright sunny skies. That was until I finished work. Then as soon as I get home the clouds started rolling in. It didn't take long for the rain to start and ruin the plans for the evening. From what I am seeing on Weather.com it looks like this weekend is going to be washed out. Well since the weather sucks and egg I guess I should tie up a bunch of Egg Sucking Leeches..

If there is one pattern a steelhead fisherman must have in their box it is the Egg Sucking Leech. Once the salmon have spawned there is abundance of nutrients left in the rivers, whether it be the recently fertilized eggs or the dead salmon themselves. When the steelhead head upstream for their late fall/early winter run they find plenty of nourishment for the trip. Leeches feeding on the recently deposited salmon eggs are a big part of their diet.  The Egg Sucking Leech is the perfect pattern to mimic this food source. This is an easy pattern to tie and can be tied in different color combinations. My personal favorite is purple and hot pink.

 
Purple Egg Sucking Leech


Egg Sucking Leech
 
Thread - Uni 8/0 Black
Weight - Medium Lead Wire (or Equal Substitute)
Hackle - Purple Saddle Hackle Palmered
 
 
Step One


Wrap Lead Wire and Start Thread
 
 
Step Two
 
Tie in Marabou Tail
 
Step Three
 
Tie in Krystal Flash on Front Side then Double Back for Back Side
 
Step Four
 
Tie in Saddle Hackle by Tip
 
Step Five
 
 Tie In Chenille
 
Step Six
 
Wrap Chenille Forward Leaving Room For Egg
 
Step Seven
 
Palmer Hackle Forward and Tie Off
 
Step Eight
 
 
Tie in Chenille for Egg
 
Step Nine
 
Wrap Chenille Forward Tie Off, Create Small Head and Whip Finish


OK Let's see who read this far down. The first person to name the three steelhead pattern I have tied so far will receive two of each pattern. Please leave a comment with your answer along with your email address for me to get back to you.


Tuesday, September 18, 2012

Anybody Feel Like a Popsicle

I know I said Fall is here the other day, but today the Fall weather arrived in full force. After being in the low 80s that last few days today's high of 64 was a shock to the system. It is way too early to turn on the heat.  After seeing Laurie bundled up in sweats, sweat shirt and blanket and she was still frozen like a Popsicle I gave in and turned on the heat. Can you believe that she is the one that loves winter but cannot handle a little drop in temperature? It looks like the weather is going to be the same tomorrow so she is already planning on making a batch of Potato Soup to take the chill off. I cannot wait!

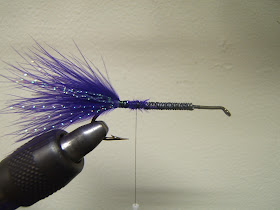
Speaking of Popsicles, I guess tonight would be a great time to head to the closet and tie up some more flies for the Salmon and Steelhead runs. The Popsicle is another great pattern for Steelhead here in Michigan. I am a firm believer that the color purple does attract fish on a bright day and couple that with all the action produced by the marabou this pattern produces fish.

Popsicle


Popsicle

Hook - Tiemco 7999 #2/0 - 8
Thread - Uni 8/0 Red
Body - Silver Mylar Tinsel
First Wing - Hot Orange Marabou with Pearl Krystal Flash
Second Wing - Red Marabou
Third Wing - Purple Marabou


Step One

 
Start Thread Just Behind Return
 
Step Two
 
Tie in Mylar Tinsel Just Behind Return
 
Step Three
 
Wrap Tinsel Back to Hook Bend Then Forward to Return
 
Step Four
 
Tie In Orange Marabou by Tip
 
Step Five

Wrap Marabou While Sweeping Fibers Towards the Rear of Hook and Tie Off

Step Six

Tie in Krystal Flash

Step Seven

Tie in Red Marabou by Tip

Step Eight

Wrap Marabou While Sweeping Fibers Towards the Rear of Hook and Tie Off

Step Nine

Tie In Purple Marabou by Tip

Step Ten

Wrap Marabou While Sweeping Fibers Towards the Rear of Hook, Tie Off Create Head and Whip Finish
 

Another version tied much fuller


Saturday, September 15, 2012

Feeling a Little Rusty

As you can tell from my last posted date, I have been away from the vise and the blog for a little bit. Now that the summertime weather is almost gone, it's time to get back to the vise and tie up a few flies for the fall season!

Fall in Michigan is my favorite time of year. Each fall I look forward to drinking fresh apple cider, eating cider doughnuts, and cooking fresh acorn squash and Brussels sprouts. In my opinion, the weather is perfect and the fall leaf color tours are amazing. Fall also means the Steelhead and Salmon are starting their annual runs. This is a great time for fishing. I'm ready for a trip north to see if I can tangle into a few Cohos while they are still fresh in the rivers. One of my favorite Salmon flies is the Rusty Rat. Not only does this fly produce fish, the colors of the fly remind me of fall. Time to tie up a few and head up to the Pere Marquette!

Rusty Rat


Rusty Rat

Hook - Tiemco 7999
Thread - Uni 8/0 Black
Tag - Gold Oval Tinsel
Tail - Peacock Sword
Rib - Gold Oval Tinsel
Body - Rear Half Orange Floss Front Half Peacock Herl
Under Wing - Orange Floss
Wing - Grey Squirrel Tail
Throat - Grizzly Hen


Step One
Start Thread
Step Two


Tie in Oval Tinsel

Step Three

Wrap Tinsel Forward Three or Four Turns. Tie Off But do Not Trim
Step Four

Tie in Four Peacock Sword Fibers Short

Step Five

Tie in Floss at Midway Point

Step Six

Wrap Floss Back to Tail Then Forward to Midway Point

Step Seven

Wrap Remaining Tinsel from Tag to the Midway Point

Step Eight

Tie In Four Strands of Peacock Herl

Step Nine

Wrap Peacock Herl Forward

Step Ten

Tie in Floss Under Wing

Step Eleven

Tie in Grey Squirrel Wing

Step Twelve

Tie in Grizzly Hen Hackle

Step Thirteen

Make Two Turns of Hackle, Tie Off, Create Head and Whip Finish